Sure, everyone knows that fast Newtonians need careful collimation. And most refractor users know that collimation is something that they almost never have to do. Then there's me...
I bought a used Celestron 9.25" SCT a while ago, and it was in perfect alignment at that time. It was easy for me to pretend it was much like a refractor and that the alignment would stay perfect. When it eventually went out of whack I started to tweak it as if I was working with my f/5 Dob. The fact that it came with Bob's Knobs encouraged me to do my tweaking in the field, leading to dreadful alignment. That was no fault of the knobs, I just didn't know what I was doing.
It took a couple of nights of dreadful images to convince me that I need to do a careful alignment of the scope. If you want to see a good explanation of how to go about this, look at Thierry Legault's instructions. He basically suggests a three step approach:
1. Course Alignment
This is the traditional centering of the secondary shadow within the defocused star. While this can be done by eye, I found it was useful to employ an imaging device to display the star. (An Orion StarShoot Autoguider works great for this.) Using this method lets you employ a nice program by Gilbert Grillot that overlays red concentric circles on whatever you're using for imaging.
2. Higher Magnification Alignment
Repeat the first step with higher magnification and using a dimmer star. You're once again centering the shadow. You'll use a shorter focal length eyepiece or a Barlow. I used a 4X Barlow with the SSAG.
3. Diffraction Ring Alignment
With the star focused you examine the diffraction rings. They should be concentric circles, and you have to carefully adjust the alignment until they are.
I did steps 1 and 2 indoors using the Hubble Optics Artificial Star. Step 3 required that I have the Hubble "star" a greater distance from the telescope than I could attain.
Here's the change in images:
 |
| Before (L) and After (R) the two-step alignment (click to enlarge) |
These are from different nights and are of different targets, but it's abundantly clear that the Before image is awful--and it's worth noting these images are unscaled crops from the center of the image. I won't show you the field edge stars of the Before, they're that bad. Here are a couple of stars from the above crops to emphasize the improvement:
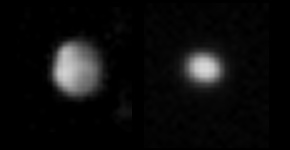 |
| Before and After (as above), 5X actual size |
That blob on the left is actually a star. The elongation of the After star is due mainly to tracking error on a breezy night. Doing steps 1 and 2 led to much better stars across the entire image.
HELPFUL HINTS for Indoor Collimation:
Put your scope on a controllable mount. Every alignment adjustment will shift the star's position, and it's much easier to reacquire the "star" if you can use the mount's hand control.
Disable Tracking. The "star" isn't moving like a real star, so your scope shouldn't be trying to track it. Some mounts may allow you to turn off tracking, but my CGEM doesn't have that capability. However, it does have hibernate mode. If you have a CGEM, point your scope at the "star," activate hibernation, and leave the power on. Your hand control's RA and Dec motion buttons will still operate.
You may have to use extension tubes. Start with the largest diagonal you've got, and then add extensions as needed. Remember, for steps 1 and 2 you don't need to reach focus, you just have to get the defocused star to fit into the field of view.
No comments:
Post a Comment