Thursday, April 25, 2024

Getting Out of Town, but to Where?


This post is going to be an exercise in overthinking a simple task like combining imaging and camping, much like the many posts I've made about batteries and such. Wander in at your own risk. 

🌲🌳🌲🌳🌲🌳🌲

Last time I said this post would be about some parks I visited in the hope of finding a nice dark place at which to image and camp. Here are the results of that little jaunt and the realization it forced upon me. 
  • Cedar Hanson County Park near Trimont: Very nice for campers, but too many trees
  • Sands Country Cove campground southwest of St. James: High density, packed even in April, which is not the nicest month to tour Minnesota. Reservations will be tight, just like how it packs the RVs together. It looks like it caters to families with big RVs. On the other hand, no trees.
  • Eagle's Nest County Park east of St. James: Needs a variance to park away from trees in an open pasture that's probably dedicated to horse riders. I've written to the county parks person about that variance, but this is a "light green" light pollution area so not much darker than a local site.
  • Voss Park, Butterfield: A large area of trees was removed and sites added since my last visit. It's also not much darker than a non-camping site I use now.
  • Lake Hanska County Park, north of La Salle: Too many trees.
Yes, that's correct, none of these were suitable.

Related: An article by the Dyrt.com reports on a poll of 7000 campers. One result was

"In 2023, 45.5% of campers reported difficulty booking a site because a campground was sold out. It was four-times harder to find an available campsite to book than it was in 2019, when just 10.6% of campers reported difficulty."

Here is the realization: Campground reservations are a necessity. Sure, some campgrounds say they are first-come, first-serve. Theoretically you can see a good forecast in the morning, hop in the car and drive three hours to one of those campgrounds hoping there's an available spot for the night. But the chances are that spot will be gone by the time you get there, meaning you have to turn around and drive three hours back home. Not good. Minnesota state parks do allow same-day reservations, but your chance of that working in your favor seem particularly small if you want more than one consecutive night.
 
The problem with advance reservations is the same as that with multi-day star parties: the weather. You can't know what you're going to get.  But unlike star parties with registration fees and associated travel expenses, camping reservations do give you an out. You can cancel the reservation and get some (or most) of your money back, and then complain about the clouds from the comfort of your own home.

🌲🌳🌲🌳🌲🌳🌲

The Hunt for Darkness


Let's say you enjoy camping and want to combine that with dark-sky imaging as an alternative to attending distant star parties.

Choosing when to camp is easy, just mesh your personal schedule with any time the moon isn't a bother. Then match that to campground availability. 

Deciding Where to camp is a little tougher. If you live in a light-polluted city you'll probably need to drive one to three hours to find dark sky.  That means you should think about what your daily safe driving range is. That's the amount of time you can stay alert and your back won't punish you the next day. For me, old and decrepit as I am, that range is about six hours. For the rest of this post I'll assume a driving range of half that -- three hours -- because that permits turning around and returning home if a crucial item was forgotten ("OMG I forgot the counterweight!"). 

With your driving range decided you can start your hunt for campsites that are reasonably dark, accept reservations, and have open sky. And I do mean hunt because campgrounds satisfying all three conditions seem to be rather rare. Some camp sites may be dark enough overhead but have troublesome horizon light domes from nearby cities in the direction you want to image. Many camps are full of shade trees that block the sky. Some like to maximize land usage by packing large RVs so tightly together that they obstruct the sky. Some are near major highways and almost impossible to book. Some are rather primitive. Will you need power and water? Flush toilets? A shower? Everyone has a particular set of requirements.  If you need to run a generator after 10 P.M. you may have issues with a campground's quiet time. And some smaller parks are just sort of unkempt or creepy, making you wonder if they're a "party park" for locals (see for example, Pine Ridge Park north of Herman). Your hunt is for a camp where you can securely image and enjoy yourself while doing so.

It's almost May now and places are taking reservations: it's time to get site hunting. For this post I used Google search, Google Earth, Google Maps, and Light Pollution Atlas 2006 (selecting the 2022 overlay). Google Earth showed me if the locations are infested with trees, Google Maps provided directions and drive times, and the Light Pollution Atlas was great for figuring out how dark a site is and what the horizon situation might be.

Other online resources that were helpful included Minnesota's state park finder and a map of Minnesota's counties. Googling a county name will point you to the county's home page, and from there you can see what it has for parks. A few counties structure their web sites as if they don't want anyone to know they have parks, so be ready to dig.

There are a lot of campground finders on the internet, two that seemed useful are Hipcamp for smaller private camps and The Dyrt for pretty much everything else.

My person site hunt was limited to the south and west of the Twin Cities because I enjoy that part of the state and it's less tree-infested than elsewhere. You're free to hunt wherever you want. But first we should think about just how dark we want it to be.


☆★✨🌟✨★☆

What is Dark Enough, and What is Too Dark?


I know, I know, there's no such thing as "too dark."  But there can be a dark so dark that it can't be reached within your driving time limit.

My very subjective take on "dark enough" is based mainly on my past imaging at different sites. 

First a bit of terminology: the Light Pollution Ratio, or LPR. LPR is the ratio of light pollution to natural sky brightness; an LPR of 1.0 means that the light pollution is equal to the natural sky brightness. The smaller the LPR the darker the sky. (The Light Pollution Atlas gives you the LPR when you click on its map.)

The diagram below shows an LPR diagram from the Light Pollution Atlas 2022 overlay. The area covered is from near the South Dakota border at left to a bit past Eau Claire WI at right, and just south of Duluth at top to Albert Lea at bottom. Color indicates LPR value with light green being between 0.6 and 1.0; dark green is 0.33 to 0.6. I've changed all areas with LPR greater than 3 to black.

Light pollution map of southern Minnesota. Click to enlarge! 

My back yard has an LPR of 29 (!), which is emphatically awful. If I want to image emission nebulae it's narrowband filter time. LRGB imaging (my preference) works well from Eagle Lake (LPR 2.34, EL on the diagram) and Starhome (a friend's back yard, LPR 3.5, SH on the diagram). They're both on the fringe of the Metro and suffer from its huge light dome. Cherry Grove (LPR 1.08, CG on the diagram) is located south of the cities and is very good overhead but less so northward and to the southeast. A person I corresponded with during my Astronomical League Bright Nebula imaging years was using LRGB from a Missouri site with an LPR of 0.6 and his images were nothing less than excellent. I've also imaged from locations where the LPR is under 0.2 and can attest to their excellence.

My take is that an LPR > 7 or so will push you to use narrowband or at least multiband filters. An LPR < 7 is probably dark enough for LRGB imaging of most targets, and an LPR < 0.6 is great for almost any DSO. If you're planning to go super deep, like imaging IFN, then you probably want it as dark as possible to reduce your total exposure time.

My hunting goal will be to find locations where the LPR is 0.6 or less; my motto will be "Go Dark Green or Stay Home." You may be willing to accept something brighter, or demand even darker based on your imaging gear and targets.

Once I determined my personal "dark enough" I could perform my hunt. What follows is the result. See the summary at the end of this post for campground LPR values, links to the individual parks/campgrounds, and other comments.

Minnesota State Parks


Minnesota state parks are widely regarded as some of the nicest in the country. The facilities are well maintained and staffed by knowledgeable outdoor enthusiasts. And lucky for us there are two parks that may be particularly suitable for imagers!

Not suitable -- either too bright or blocked sky: Big Stone Lake, Blue Mounds, Camden, Flandrau, Fort Ridgely, Glacial Lakes, Kilen Woods (probably), Lake Maria, Minneopa, Minnesota Valley, Monson Lake, Myre Big Island, Sakatah Lake, Sibley, Split Rock Creek
 
Suitable: Lac qui Parle and Lake Shetek.

Lac qui Parle is a little darker than Lake Shetek but Montevideo to the southeast maye put up a light dome. One person who has been there said he did not note any problem with the horizon. The positions of these parks are indicated on the diagram above. Both parks can be found in its lower left corner.

All state parks require reservations.

Minnesota County Parks


County parks operate on generally lower budgets and their facilities vary widely. Even so, they will likely be packed full of campers during summer. An additional factor for these parks are monthly and seasonal campers who will fill spaces semi-permanently. A brief look at County parks shows a few promising locations:

Jackson County: Sandy Point (reservation required, choose site carefully to avoid trees, needs a visit to verify horizons)  

Murray County: Sundquist, Lime, and Swenson (no reservations)

Lincoln County: Picnic Point  and Norwegian Creek (reservations required)

Lyon County: Twin Lakes (reservations required)

Yellow Medicine County: Timm Park. Needs a visit to see which if any sites are suitable. (reservations required)

Counties that have no suitable county parks are Blue Earth, Brown, Chippewa, Cottonwood, Faribault, Freeborn, Kandiyohi, Martin, McLeod, Meeker, Mower, Nicollet, Nobles, Pipestone, Redwood, Renville, Rock, Sibley, Swift, Watonwan 


Minnesota City and Town Parks


Many small cities and towns have parks that offer camping. These are generally near the population center and so will have considerable light pollution. I found none that were satisfactory for imaging. 


Private Campgrounds


I am omitting campgrounds that pack RVs tight together; giant RVs are as opaque as trees. All of these need to be visited to assess their suitability.

Camping on Private Lake. This was found on Hipcamp. It has an LPR of only 0.3! You would need to talk to the owner about being able to set up away from the trees. If you don't need AC power siting might be easier. Reservations required.

Camp Summit in Hadley. Seven sites, accepts reservations, but also allows space-available. LPR = 0.45

Talking Waters in Gary, SD. Many sites, requires reservations. LPR = 0.51

Niemackl Lake near Herman, MN. Accepts reservations by phone. LPR = 0.26. I visited this a few years ago and found maybe 3 or four of the 10 sites were decent. Neimackl has the distinction of being the darkest campground in my survey!

There are a few places in northern Iowa that look very good, but they are generally about 3 hours distant and will be very busy.

There are probably other suitable private campgrounds. If you know of some please let me know.

Summary: The Too-Short List of Suitable Campgrounds In SW Minnesota


This omits campgrounds that need a visit to judge suitability. (Trees look bigger in person than on Google Earth!) 

Reservations required:


Lake Shetek S.P., LPR = 0.52, use only the Sunrise Campground

Lac qui Parle S.P., LPR = 0.37, use only the Upper Campground

Twin Lakes C.P., LPR = 0.43, only north portion can be reserved at this time

Picnic Point C.P., LPR = 0.42

Norwegian Creek C.P., LPR  = 0.51

Reservations not accepted:


Sundquist C.P. , LPR = 0.35

Lime C.P., LPR = 0.43

Swenson C.P., LPR = 0.41


If you have experience imaging at these or others, let me know how you liked the location!


Thursday, April 18, 2024

Plans for Summer '24

Because last year's plans went so well (which I write with heavy sarcasm) I'm going to make new, possibly better plans for this year.

Star Parties! From none last year to three this year?

The Iowa Star Party finally moved their party date from the usual late August to October. Now although I just love camping in sweltering heat and dew point temperatures of 70+ degrees F, this is a welcome change. It's bound to be cooler in October, I hope, and by then the expected layers of smoke will be gone or at least diminished. As soon as registration opens I'm signing up, and that's meant with sincerity. 

Iowa Star Party

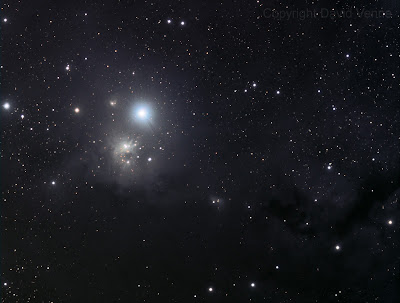
The IaSP has always been one of my favorites. It doesn't have the darkest sky, but the facilities are nice and the observing field is big and open. Civilization (small-town Iowa style) is only minutes away in Coon Rapids (population 1279). My imaging target will be a revisit of IC 348. Here's my image of it from Stacy, MN in 2014:


The bright star is Atik (Omicron Persei) and the dark clouds beneath are Bernard 3 and 4. This was imaged with my TV-102 and ST8300 Camera.  I thought at the time it was an interesting subject, and now I'll go after it with better gear, better sky, and (I hope) more time on target. There is a large emission nebula in the right half of the image that is barely hinted at here. Definitely needs better data!

Northern Nights Star Fest

With the Iowa Star Party vacating the labor day weekend there's no longer the usual schedule conflict with the NNSF, a north-woods party sponsored by the Minnesota Astronomical Society. The dark sky is spectacular for this party; aside from clouds the only thing that might cause problems is a nice Aurora. I've already made my reservations for this and have selected a target: the Soap Bubble. This is a pretty little planetary nebula sitting near the Crescent nebula in Cygnus. Here is my 2013 image of the crescent:


This Ha+OIII narrowband image from my light-polluted back yard is far too brief to capture the Soap Bubble; if you know just where to look in this image you can see it's not there. Sometimes the data simply aren't adequate. Repeated attempts at overprocessing failed to pull it out of the noise. The hope is that with the dark sky of the NNSF and a few nights on this one one target using LRGB--it will be there!

Nebraska Star Party

NSP is always a challenge. Heat. Thunderstorms. Mosquitoes, little prickly pear cacti, and in recent years, unusually high humidity.  Add to that layers of forest fire smoke and even unhealthy air quality as Canada burns. (It's possible the smoke may be part of a long term trend.)  I hope to go, but it will probably be a wait and see game to see if it's worth the travel time.

If I do make it, I think I'll update yet another old image of mine, M8 (the Lagoon). Two solid nights on the Lagoon should produce something spectacular! And if there are three or four good nights I'll tack on an overlapping frame to make a mosaic of M8 and M20 (the Trifid Nebula)

From the 2013 Iowa Star Party:


Nothing special, but I was pleased with it at that stage of my deep sky imaging. The scope was a 72mm f/6 refractor. Eleven years later I'll use a 106mm f/5 scope; I should be able to do much better.

----------------

Next post --- I'm still looking for a reasonably close-in camping location that is convenient to use on a same-day basis and has at least green-zone darkness as defined by this scale. I visit two new campgrounds two hours from a southern suburb of Minneapolis, and revisit three others that I previously found unsatisfactory to see if anything has changed. See what I learned this time around.

Wednesday, April 10, 2024

Pegasus FocusCube Version 3; Back from the Eclipse

Pegasus FocusCube Version 3

I've been using the Pegasus FocusCube Version 2 for a couple of years and it's been amazing. The only problem I ever had with it was my own fault; unknowingly I tried to run it a few times past the inward limit of my focuser and that loosened the shaft coupler to the point the FC2 lost track of where it was. When I'm not trying to torture the poor thing it has always delivered a sharper focus than I ever achieved manually. 

Pegasus recently introduced FocusCube Version 3, and FC3 has new features, only one of which really interested me -- it's USB 3 and only needs USB power to operate. My first thought was "wow, one less cable!"  

Instead I'm having to choose between two options: buying a new, big, $640+tax usb/power hub or kludging together my existing hub and an old powered USB hub. Of course my frugal nature demanded I go with the latter option!

Why?  The FC3 gives me three devices that require USB 3 power or communication bandwidth: FC3, ASI 120MM Mini guide camera, and ASI 2600MM Pro imaging camera.

Alas, my current USB hub, a Pocket Powerbox Advance Gen 2 has only two USB 3 ports. My delusional mind had assumed all four of the USB ports my existing hub (a Pegasus Pocket Powerbox Advance Gen 2) were USB 3. My delusion was reinforced by the mislabeling on the Powerbox case:

My Pocket Powerbox Advanced Gen 2 Collector's Edition with incorrect USB port label

The correct label can be seen on the Pegasus product page.

The kludge I'm putting together involves using Velcro to piggyback an old hub on the Powerbox. In the end this means instead of reducing my cable count I'm going to increase it by one. Oh well ...

On the other hand, NINA fired it all up without a glitch, so it's ready for imaging!

Moving The FocusCube 2 to the AT-65EDQ

A second reason for purchasing the FC3 was so my old FC2 could be installed on my AT-65EDQ, a small astrograph that can produce lovely images. 

I plan to use the AT-65 mainly to collect stellar spectra because the camera-to-scope connection must use a 2" nosepiece. A nosepiece makes it very easy to place a diffraction grating in the optical path. And at f/6.5 it's a little better for spectra than my FSQ at f/5.

The AT-65 isn't on the list of scopes compatible with the FC, possibly because of the diameter of its fine-focus shaft. The smallest shaft coupler provided with the FC3 was 4.0mm -- much too large for the 2.5mm AT-65 shaft. Unfortunately the smallest coupler I could find for sale was 2.3mm. (Maybe that  corresponds to some common non-metric size? I tried to file down the fine focus shaft, but it's made of an alloy harder than my files. I did find a nice attachment for my rotary tool that must have had emery or diamond on it, and that took the shaft down to size.

Both FCs are now working with Unity and NINA. Let's have some clear nights now!

Back from the Eclipse

We drove from Minneapolis to South Washington, Indiana.  Ten hours in rain to get there the day before, but it was worth it--almost perfect sky for the entire eclipse -- and most importantly at totality. The naked-eye prominence was worth it alone, and I doubt any image will be able to do it justice. 

Arriving a day early and leaving the day after meant no traffic problems.  This was my fourth eclipse (1978 North Dakota, 1998 Aruba, 2017 Nebraska were the previous) and probably my last. And I'm pleased to say I took no images, I just looked upward and enjoyed.

The fact that Texas was cloudy and the Midwest clear demonstrates perfectly the difference between climate and weather


Friday, March 29, 2024

New Battery - LiFePO4!

New Battery and Power Box

I usually image from places that have AC power--but not always.  When there isn't AC I need to run from batteries. It's gotten to the point that I like batteries so much I use them even when AC is available. But -- the batteries I've been using are heavy and bulky; they are really not fun to lug around. And they're barely adequate for multiple-night star parties, too.

My goal has always been to eventually give up lead-acid batteries for lithium. Lithium's advantages over lead are well known, but it has always been the price that stopped me from jumping on their bandwagon. This year that changed; prices came down a lot!

I sprang for a 50Ah LiFePO4 battery--1/3 the weight of my 50Ah lead battery, and that's a world of difference. The upgrade motivated me to put it into a smaller case that I had sitting around, and to improve the connection ports over those on my old case. 

The new case outputs are three 12V automotive sockets and two Anderson Powerpole (APP) connections. A third APP allows me to connect to my solar panel or an AC charger. There's an on/off rocker switch to toggle between charging and power box use, and a panel meter for monitoring the state of the battery (more about that later).

There's one change inside the box, too. All the outlets pass through an APP distributer that allows each to be independently fused using common bayonet-style fuses.

The new power box

Testing the new battery

Of fundamental importance with any battery is knowing when to stop using it. Discharging a rechargeable battery too deeply will reduce its capacity and useful lifespan. But what exactly is "too deeply" and how will we know when the discharge is approaching that?

Here is a much-copied table that you can find all over the Internet: 

Table relating State of Charge to resting voltage and
suggesting what is "too deeply" 

Some terminology:

  • State of Charge (SoC) is basically a measure of how much energy is left in a battery compared to what it has when fully charged. A full battery has SoC = 100%, an empty battery has SoC = 0%.
  • Operating Voltage (Vo) is what a voltmeter reads across the battery poles while it is in use. 
  • Rest Voltage (Vr) is what that voltmeter would read when the battery is not discharging and has not been discharging for at least an hour. The table's voltages are all rest voltages. Vr is impossible to measure while imaging--unless you're willing to shut down to let the battery rest.

The third column in the table tells us SoC shouldn't slip past 20% if the battery is to stay nice and healthy. My battery is advertised to endure 4000 recharge cycles before needing replacement -- if the recharge comes before the SoC slips to 50%. Given my current age and how often I image, the battery will never see 4000 recharges; in fact I'd be surprised if it sees more than 200, and the majority of those will be from a SoC above 50%. But it's nice to know that if circumstances require it I can take it deeper. 

To be conservative about this, I'll preselect SoC = 20% as a safe stopping point. I'll probably never reach that because I can always recharge the next day using AC or my solar panel. 

If I can't recharge the next day and want to image anyway, how do I track the SoC so that I can prevent the battery from going too low? First, I'll need to know its energy content when the SoC is 100%. If I can determine how much energy it has provided since the last charge I can estimate SoC by

    SoC = 100% * (1 - (energy discharged / energy content at SoC 100%))

Given the battery's rated voltage and amp-hour capacity I can estimate the battery's full capacity:

   Energy content at SoC 100% = (rated V) x (rated amp-hour capacity) 

        = 12.8V x 50Ah 

        = 640 watt hours (Wh)

Why do I call this an estimate? Every battery is a little different even when new, and over time some of that capacity will be lost. Generally new batteries have a slightly larger capacity than their rating, but I'll go with 640Wh to be conservative.

I added a panel meter to the new box that gives me the amount of energy discharged; this makes  estimating SoC easy.

Panel meter showing a battery at rest after discharging 416Wh

If my aim is to not let the battery fall below a SoC of 20%, all I need do is make sure that number never goes over (1 - 20%) * 640Wh = 512Wh. That way, happy battery and happy imager!

Now you're probably wondering about that solar panel and asking if that isn't heavy and bulky, too. Oh, it is! But combined with the very light lithium battery it still beats the multiple lead batteries required for that rarest of events, a five clear night remote star party!

One more thing, a tiny hack. The panel meter has a button that lets you zero the energy discharge counter after a charge. It's also what turns on and off the panel backlighting.  The button is countersunk and can only be depressed by something relatively pointy. My solution is a 3mm glass bead held in the button hole by stretchy friction tape. You can see it just to the right of the panel display.

That's more than enough battery talk. Next time some even more mundane chatter about upgrading my Pegasus FocusCube to Version 3, and putting my old Version 2 on an AT-65.


Wednesday, December 20, 2023

A Brief Pause

The seasons have changed again, at least according to the calendar if not the thermometer. Despite the pleasant autumn I managed to be lazy and not haul my imaging gear out. I think an early cold snap convinced me it was winter. The reality is it's almost the new year, so time for a look ahead to 2024.

C9.25 and TV-102 back in service

As a last gasp of 2023 activity I did do a little bit of scope maintenance. First it was the turn of my old Celestron C9.25 to get collimated; I had cleverly manage to mess up its alignment to the point it was useless. This time I was very careful. Only small adjustments were made until I had it close to correct. I'll still have to do a finer tuning in the spring/summer when I can get the scope out under some decent stars.

The other bit of work was for my TV-102. Some years ago (nine? Amazing how time flies!) when imaging  IC 348 in Perseus, I noticed an irregularity in the flare around 4th magnitude omicron Persei. You can see it as a notch at about 5 o'clock.  

Omicron Persei with a mysterious dark notch

Here's a link to the full image on AstroBin. For comparison, here is Gamma Cas with my FSQ106, showing what a flood of starlight should look like.

Gamma Cas (FSQ-106EDX4)

The dark notch isn't awful, but it is a serious distraction. The primary suspect was something in the optical path. It was a simple thing to point the scope at a light surface and look through the objective from the focuser end. Clearly apparent was a sort of bump protruding into the circle of the objective. But what was it? Had something fallen into the OTA?

In the dangerous tradition of "monkey see, monkey disassemble," I took off the objective cell and discovered the problem. A bit of the TeleVue flocking paper inside the telescope tube had blistered up and gotten into the way of light. The fix was obvious to this monkey so I carefully filed down the petrified bump, put the objective cell back in place, and called it a done deal. 

Then something amazing happened: I had a thought. I wondered if I had gotten the cell back in place correctly, and was the scope still optically aligned? Dashing to the Internet I started reading posts about the travails people had collimating TV-102s. Also how they often had to fabricate clever jigs to do the alignment. Said jigs were far beyond my technical skill to create, so I was depressed. Not wanting to admit to myself that I might have made more trouble than I had remedied I set the scope aside and moved on to  imaging with my C9.25 (not yet misaligned), AT65EDQ, and eventually FSQ-106. I'd revisit the potential damage later.

Fast forward nine years to the other night when I put the TV-102 on the mount and actually looked through it at a star. It wasn't a complete star test, but at 90X Polaris A and B looked like pinpoints. At  450X racking in and out a touch gave decently symmetric airy disks. So maybe I got really lucky and it's fine. The old scope can rejoin the fleet now. I would like it functional for that eventual time when I return to visual observing. It works wonderfully with my 31mm Nagler Type 5 hand grenade, and to me it looks like the classic telescope. A picture of it from 2008 still graces the WhiteRock Conservancy (home of the Iowa Star party) web site.

AT65EDQ

After adding the FSQ-106 for imaging my poor AT65 has languished. It's an imaging scope that's corrected to provide astrograph flatness, meaning it's not a so great for visual use. Its FL of 420mm (f/6.5) is close to that of the FSQ with the 0.73X reducer (f/3.65 and 387mm) so it's somewhat redundant. But it is small and light and could easily sit on something less substantial than my G11. 

All it really needs to be a little sibling to the FSQ is electronic focusing, so that's what I'll be adding to it. And a nice Seahorse hard case for travel. Then I only need to rig a way to mount the Pegasus powerbox to it. More about that next time.

Veil Mosaic

I have all the data, I've been delaying processing until snowy winter hibernation mode starts. In the Twin Cities in a given year a "white Christmas" with 1" of snow or more on the ground has a chance of about 71%. But that won't happen this year!  The ground is bare and the forecast is for a record-warm 53 on Christmas Eve with a possible thunderstorm. The non-winter of 2023-24 is on track to continue into January.

When the snow finally arrives I'll start with a mosaic of the luminance data first to see what I've got, then repeat for each of the color channels.

 AstroBin Voting

I like to post my better pictures on AstroBin. It's mostly a vanity exercise but I think that posting technical details about images can be helpful to others. I know I've learned some things by seeing how other people acquire their data. 

Because AstroBin is a sort of social medium members are allowed to vote for images and there are best image designations. Some people complain that it's highly subjective, motivated by people trying to build their posse of followers, get votes in return, etc. All of that is possible but I don't care. It's fun, and I like it when I get up-votes. Although I admit I don't often understand why some of my images get more votes than others I've posted.

I've noticed something odd in the last year or so, though. Some of my dusty old posts that have been sitting quietly will suddenly get a flurry of votes from unfamiliar people. An example is this image of Jones 1 from 2015. Earlier this month it got four new votes within a few minutes of each other. Other people have imaged this object and created far better images than mine, so I have to ask why I got those votes.

Possibly it's people fishing for votes, but why would they reach back to an image from eight years ago? Why not take the time-honored approach of following someone so that they'll reciprocate and build your posse?  The near-simultaneity of the votes makes me think it might be something more devious.

Oh well, maybe the applicable adage is "don't look a gift horse in the mouth." So I say: Thank you  for your votes, mysterious time-lagged strangers! Maybe next time don't wait 8 years!

Wednesday, September 20, 2023

Panels and Pieces

September update with shouting headlines:

GUIDING WOES SOLVED!

After an August imaging session that featured repeated guide camera disconnects I decided that it was time to move on from my QHY5L-II. I'd read somewhere (CloudyNights?) this was one of its traits. Disconnects have been a repeating problem during its service to me. There have been nights I've retreated to my good old StarShoot Autoguider.

I had tried to work with the camera. It seemed as though the issue was insufficient power, so I used shorter and shorter USB cables, then a powered USB 3 port and a very short cable. The disconnects became less frequent but imaging time was still being lost. 

Something had to be done; I can tell you that it is not fun fussing around at 2 or 3 AM trying to get things going again after a disconnect. So I went all-ASI and purchased an ASI 120MM Mini (mono). My only qualms about the Mini were possible software collisions with my imaging camera, an ASI 2600M, and if it would be compatible with the QHY mini guide scope.

The only camera confusion was mine when I gave PHD2 the wrong camera to use. The ASI120 seems to work well with the QHY mini guide scope, although it may need a little more backfocus. And during an evening of imaging not a single disconnect, so for the moment I'm declaring problem solved. I may swap out the QHY guide scope for my old Orion 50mm guide scope, just for the added aperture.

MOSAIC DATA COMPLETED!

My ~57 megapixel mosaic of the Veil nebula has taken long enough, hasn't it? Panel 1 (of 6) was imaged June 19. Panels 2, 3, and 4 were imaged August 25 and September 11. The final panels, 5 and 6, were imaged September 17. The long summer delay was thanks to smoke, air quality, heat, clouds, and my availability. It's been a summer. 

I don't yet know how good the light frames are of these but they will have to do. Each panel is made of approximately 48 minutes of luminance, and 24 minutes of each color channel. This means it's not particularly deep, but this is the Veil Nebula and hardly the dimmest object in the sky. I could collect more data, but I'd like to move on to other targets.

DISASTER AVERTED, TWICE!

This is how my night imaging the last two panels started....

Disaster #1: The dew strap for my FSQ's objective had a short that I first noticed as a wild variation in the Pegasus Ultimate PowerBox current. It was hopping between a low, reasonable value and 4+ amps as it tried to control the situation. Its control probably prevented the Powerbox's demise, a meltdown of the strap's cable (it did become too hot to touch) and perhaps even damage to my AC to DC power supply. 

Disaster #2: Without the dew strap imaging could last only until I saw dew beginning on the imaging scope's objective. I hoped I'd be able to get at least one of the two remaining Veil panels done but it seemed doubtful. There was no breeze to keep the ambient temperature from cooling rapidly and because I was imaging almost straight up the objective would probably dew quickly.

Maybe it was convection from the power supply and the cooled imaging camera or just plain good luck but it somehow stayed dew-free for the time required to get both panels imaged.

NEBRASKA STAR PARTY 2023: SMOKE AND CLOUDS!

Okay, I didn't attend. I'll sit in judgement of it anyway, partly to justify my staying home but mainly to question the wisdom of traveling to distant places for imaging. Which is not to say I won't go next year, if someone could do something about all that smoke. As for the heat--it's not NSP without a day or two of 100-degree temperatures or hotter, is it?

Here are the day-by-day NSP 2023 imaging conditions as gleaned from the weather service and air pollution monitors.

Saturday Night: red category air quality and terrible transparency. I'm of an age that puts me in the group the air quality people always caution about being active when the air is this bad. We had a couple of days this summer where I live that were as bad as this and the surface smoke was so thick that it looked like a thin fog. Setting up camp was not something I'd have wanted to do in red air. And of course, with the smoke the greatly reduced transparency for imaging negates the point of going someplace dark like NSP.

Sunday Night: Saturday night all over again.

Monday Night (First "official" night of NSP): Clouds and a thunderstorm.

Tuesday Night: Probably clear from Midnight to 2 AM, then rain around 3 AM. Very humid (dew point temperature near 70 degrees) so super uncomfortable sleeping in a tent on the observing field.

Wednesday Night: Partly cloudy all night. 

Thursday Night (my last night at NSP had I attended): Partial clearing around 12:30 AM, then partly cloudy until 3.

So maybe a couple of hours of imaging Tuesday night and again Thursday night; for maybe a total of four hours of smoky sky imaging across six nights. Add to that unhealthy air quality on two nights.

Some years NSP can be a fun vacation in the wilds of Nebraska with very dark sky. Some years not so much. If the wildfire smoke becomes an annual problem NSP will difficult to justify as a travel destination.

On the other hand, with summer smoke affecting most of the region, where else would you go?


That's all for this dramatic update!


Monday, July 10, 2023

A Practice Mosaic Using Photometric Mosaic in PixInsight

During the time between first and third quarter moon I thought it might be good to look at methods used to make mosaics. I had no idea what was available for doing that in PixInsight.

I learned there are a few ways to go about making a mosaic. The one that's often mentioned is the Star Alignment (SA) process. SA is usually spoken of as a rough alignment suitable for two-tile mosaics. For merging more tiles together (my eventual Veil mosaic will mean combining six) other methods can give better results.

I'll give them a try, but first I wanted to get a baseline merge using SA. To do this I'll create two tiles from an image of the California Nebula I made last year. I'll just cut it into two pieces.

Here is the image as fully processed in its nonlinear form:


Original Finished Image


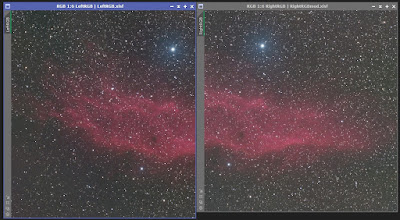
Mosaics are built from linear images, and fortunately I kept the linear version of this. The left tile will be a simple crop. The right will start as a crop and then get modified to resemble some of the differences one might see in images taken days or weeks apart. Different dithering or polar align drift might mean different cropping away of poor signal areas, so I'll change its size.  Not having a rotator means it may be off by a few degrees, so I'll rotate it by three degrees. Lastly, the second tile may have a different luminance level thanks to smoke or clouds. Most of this should be removed, but I'll leave some in to see how well it gets handled. (This is done by tweaking the right tile with the Curves Transformation.) Here are the resulting left and right tiles:


Left and right "tiles"


You can clearly see they're not the same size. The other modifications are more subtle but if not treated correctly could result in a bad  merge seam, misaligned tiles, and possibly other defects.

The easiest method for merging the two panels is Star Alignment (SA). I'm going to do this using the settings suggested by Kayron Mercieca of Light Vortex Astronomy on this page. I'm going to supply SA with previews because it's so easy to do for a 2-panel mosaic. My chosen overlap is about 40%, larger than the 30% I'm using for the Veil mosaic. Executing SA gives me this:


Rough mosaic using only Star Alignment

Inspection of the result shows no seams, and no odd stars. It's perfectly acceptable, and confirms that (at least in this case) SA is suitable for a two-tile mosaic.

Next up is Gradient Merge Mosaic (GMM). I again used the methodology prescribed by Mercieca, first building a synthetic star field and then registering the tiles to it using SA. Then the right tile is processed by the dna Linear Fit script to insure that it matches the left script's brightness. Finally, GMM merges the two tiles.

A common problem with GMM is star pinching at the overlap edge, and my result showed severe pinching. The first fix is to adjust two parameters in GMM. Doing so helped a little, but not nearly enough. When this fails the remedy is to use Clone Stamp to remove bright stars at the offending edge. This did reduce the pinching, but not only left some and created new artifacts stemming from Clone Stamp.

After considerable efforts to deal with the pinching I came to the sense that GMM does not cope will with images having a lot of stars. This is the case for the California Nebula tiles; it will also be true for my planned Veil mosaic. 

SA and GMM are the only methods described by Keller in his book "Inside PixInsight," so I was not happy. A little googling turned up another method: Photometric Mosaic (PM). PM looked very promising!

Here is a great tutorial for PM

I followed the tutorial with one change: I used the Mosaic Join /  Combination mode Overlay rather than the Blend or Average methods the presenter recommends. 

The result was excellent! There are no perceptible seams or artifacts at all, even when boosted autostretching is used. Here is the result, with a quick autostretch to be nonlinear:


If this lacks the contrast of the original image it's due to using only autostretch in the processing.

I think I'm now ready for building my mosaic, and it's a day past 3rd quarter--so let the clear evenings commence!

 -------------------------------------

Here's a callback to an earlier post titled "A Wristwatch for Astronomy?" The watch in question worked well in almost all regards---big, easy to read, and of course it kept time adequately. Where it failed was the luminescence. The watch hadn't been properly "charged" before wearing, so I was only able to read it using my red light. Next time I'll remember to feed it plenty of nice yummy photons!